Robust Development Methodologies - Formal)
Introduction
You now have run your own, simple, application developed with Zephyr RTOS. However, you have little to no knowledge whether this simple application could be used - from a qualitative standpoint - in a safety environment. This codelab aims at adding this dimension to your project so as to have sound foundations for future work.
Moreover, you will get the first understanding of the basic principles of software testing and, in particular, embedded software testing. You will then experiment with testing by running existing Zephyr RTOS tests with the provided twister test runner. Finally, you will write some simple test applications using the ztest framework.
What you’ll build
In this codelab, you will understand the required tools and guidelines for building qualitatively good SW - attitude that should be used while creating any type of SW. You will also understand how to interpret the results delivered by the tools used in order to improve your work.
In addition, you will also learn how to ensure quality through the use of unit testing, an effective way to ensure one does not introduce errors by mistake. For this
- You will run existing tests and collect test results in various formats using the twister test runner.
- You will understand how to build your own test programs with the ztest test framework and you will write a few tests.
Lastly, you will put everything together in a CI/CD environment.
What you’ll learn
- How to set up the tools for ensuring MISRA compliancy.
- Start ensuring quality throughout the development lifecycle.
- Understand the different elements composing quality and to interpret the results provided by the different analysis tools.
- The basic principles of embedded software testing.
- How to run tests and check test results with twister.
- How to write your own test programs with the ztest framework.
- How to deploy a CI/CD environment for testing Zephyr RTOS applications.
What you’ll need
- You need to have completed the Getting started with Zephyr RTOS codelab.
- You need to have finished the Digging into Zephyr RTOS.
- Zephyr Development Environment for building and running the tests.
- A good understanding of the Zephyr RTOS library architecture and principles.
Install the MISRA checker
During this course, we will use a homemade misra_checker, created with
the support for Claude AI, that supports ensuring our code conforms to
chosen MISRA guidelines. While it is a good opportunity for learning how to
comply to quality guidelines, one shall bear in mind that for production ready
developments, a proper, certified tool is used.
In order to install it, clone the corresponding repository and add it your project.
Important
For best results, it is mandatory to installing libclang to using the tool. One can do so
with
pip install libclang
Hint
One may use west to install such dependency.
Do not forget to add the application to your virtual environment.
Important
The MISRA organization allows checkers to run an analysis and publish,
should there be any, the violation ID but not the text accompanying the
violation (here more details).
If you want to access this text, you need to purchase a copy of
MISRA C:2025/MISRA C++:2023
for a small fee (15 £) - a document that is very interesting as it gives
the rationale behind the different rules. An alternative is to use a
proprietary tool (see later “MISRA - Going beyond”),
whose MISRA supported checks
may help already with the meaning of the findings.
Update 03/24: the mapping file can be found under https://gitlab.com/MISRA/MISRA-C/MISRA-C-2012/tools/-/blob/main/misra_c_2023__headlines_for_cppcheck.txt?ref_type=heads
Run a first MISRA analysis
For our first analysis - to ensure all works - we will make use of a MISRA example:
// Sample file with deliberate MISRA C++ 2023 violations

#include <stdio.h>           // VIOLATION 30.0.1 — use <iostream>
#include <string.h>          // VIOLATION 21.2.2 — C string header
#include <stdlib.h>          // VIOLATION 18.5.2 — has exit/abort

#define MAX_SIZE 100         // VIOLATION 19.0.2 — use constexpr
#define SQUARE(x) ((x)*(x))  // VIOLATION 19.0.2 — use inline function

int global_counter = 0;

class Sensor {
public:
    virtual void read() {}
    int getId() const { return id_; }    // OK — protected accessor is fine
protected:
    void helper() {}                     // OK — protected method is fine
    int raw_value_;                      // VIOLATION 14.1.1 — protected data member
    float calibration_;                  // VIOLATION 14.1.1 — protected data member
private:
    int id_ = 0;                         // OK — private data
};

class PressureSensor : public Sensor {
public:
    void read() {}                       // ADVISORY — should use 'override'
};

int divide(int a, int b) {
    if (b == 0)           // VIOLATION 9.3.1 — missing braces
        goto error;       // VIOLATION 9.6.1 — goto

    return a / b;

error:
    return -1;
}

void process_buffer(char* src, char* dst, int len) {
    memcpy(dst, src, len);           // VIOLATION 21.2.2 — use std::copy
    memset(dst + len, 0, 10);        // VIOLATION 21.2.2 — use std::fill

    char* buf = (char*)malloc(256);  // VIOLATION 8.2.2 — C-style cast
                                     // VIOLATION 21.6.1 — malloc
    if (buf == NULL)                 // VIOLATION 7.0.2 — use nullptr
        return;

    free(buf);                       // VIOLATION 21.6.1 — free
}

void risky_exit(int code) {
    if (code < 0)
        exit(1);          // VIOLATION 18.5.2 — use exception or return
}

int main() {
    int* ptr = new int(0x1aff);  // VIOLATION 21.6.1 — dynamic alloc
                                 // VIOLATION 6.5.2 — lowercase hex 'a','f'

    int octal_val = 0755;        // VIOLATION 6.5.1 — octal literal

    volatile int sensor = 42;    // ADVISORY 10.1.2 — needs justification

    register int fast = 0;       // VIOLATION 6.3.1 — deprecated keyword

    switch (octal_val) {
        case 1:
            global_counter++;    // VIOLATION 9.4.2 — no break/fallthrough
        case 2:
            global_counter--;
            break;
        default:
            break;
    }

    delete ptr;                  // VIOLATION 21.6.1 — delete

    return 0;
}
Once done, run the misra_checker tool and inspect the results. You can run the
tool by entering:
python misra_checker.py example.cpp --rules 9.4.2
The above example tests the example.cpp against the rule 9.4.2 (The structure of a switch statement shall be appropriate).
Definition of MISRA rules
A selected list of MISRA rules can be found under Documentation.
First results
Your analysis should get the following result
python misra_checker.py example.cpp --rules 9.4.2

🔍  MISRA C++ 2023 Checker  │  libclang: ⚠️  regex-only  (pip install libclang for AST checks)


────────────────────────────────────────────────────────────────────────
  📄  example.cpp  (1 finding)
────────────────────────────────────────────────────────────────────────
  [Required ] Line   68  Rule 9.4.2     The structure of a switch statement shall be appropriate
                ↳  case 1:
                ℹ  No break/return/throw/fallthrough before next case

════════════════════════════════════════════════════════════════════════
  Total: 1  │  Mandatory: 0  │  Required: 1  │  Advisory: 0
════════════════════════════════════════════════════════════════════════
Definition of rule 9.4.2
If we now look at the explanation of rule 9.4.2, here is what one could see:
-
A title
Rule 9.4.2 — The structure of a
switchstatement shall be appropriate -
Characteristics
Property Value Category Required Analysis Decidable, Single Translation Unit References [stmt.switch],[dcl.attr.fallthrough] -
Definition(s)
The substatement of a
switchstatement is called the switch body. It shall be a compound statement.A labeled statement, along with the complete chain of its substatements that are also labeled statements, is called a label group. A label group directly enclosed by a switch body is called a switch label group.
The statements directly enclosed by a switch body are partitioned into switch branches, with each switch label group starting a new branch.
-
Restrictions
A
switchstatement is structured appropriately when all of the following hold:- The condition shall only be preceded by an optional simple-declaration
caseordefaultlabeled statements shall only appear as part of a switch label group- Switch label groups shall only contain
caseordefaultlabeled statements - The first statement in a switch body shall be a switch label group
- Every switch branch shall be unconditionally terminated by one of:
- I. A
breakstatement - II. A
continuestatement - III. A
returnstatement - IV. A
gotostatement - V. A
throwexpression - VI. A call to a
noreturnfunction - VII. A
fallthroughattribute applied to a null statement
- I. A
- Every
switchstatement shall have at least two switch branches - Every
switchstatement shall have adefaultlabel, appearing as either the first label of the first switch label group or the last label of the last switch label group
-
Exception(s)
If the condition of a
switchstatement is an unscoped enumeration type that does not have a fixed underlying type, and all the enumerators are listed incaselabels, then adefaultlabel is not required.Note
Even when the condition of a
switchhasenumtype, listing all enumerators incaselabels does not makedefaultredundant, as the value could still lie outside the set of enumerators. -
Examples
These are generally split into
-
Compliant
switch ( int8_t x = f(); x ) // Compliant — simple-declaration before condition { case 1: { break; // Compliant — unconditionally terminated } case 2: case 3: throw; // Compliant — unconditionally terminated case 4: a++; [[fallthrough]]; // Compliant — explicit fall-through attribute default: // Compliant — default is last label b++; return; // Compliant — unconditionally terminated } -
Non-compliant
switch ( x = f(); x )        // Non-compliant — x = f() is not a simple-declaration
{
    int32_t i;               // Non-compliant — not a switch label group

    case 5:
        if ( ... )
        {
            break;
        }
        else
        {
            break;
        }
                             // Non-compliant — termination is not unconditional

    case 6:
        a = b;               // Non-compliant — non-empty implicit fall-through
    case 7:
    {
        case 8:              // Non-compliant — case not in a switch label group
            DoIt();
    }
        break;
}                            // Non-compliant — default is required
Additional non-compliant patterns
switch ( x )                // Non-compliant — only one switch branch
{
    default:
        ;                   // Non-compliant — default must also be terminated
}

switch ( colour )
{
    case RED:
        break;
    case GREEN:
        break;
}                           // Non-compliant — default is required

switch ( colour )           // Non-compliant — only one switch branch
{
    case RED:
    default:                // Non-compliant — default must be first or last label
    case BLUE:
        break;
}
Compliant by exception
enum Colours { RED, GREEN, BLUE } colour;

switch ( colour )    // Compliant by exception — all enumerators listed,
{                    // unscoped enum without fixed underlying type
    case RED:
    case GREEN:
        break;
    case BLUE:
        break;
}
-
-
References to other rule(s)
See also: Rule 9.4.1, Rule 9.6.2, Rule 9.6.3, Rule 10.2.3
Note
It is not always possible to avoid “cross-talk” between rules, so some files will violate multiple rules.
Question 1
Analyze rule 14.1.1 (of example.cpp) with misra_checker and
state what the rationale for Non-compliancy is. Is this a rule or a
directive?
Solution
- It is a directive (Dir 4.7)
- Ignoring return values may result in undefined behaviour as the exception is not handled properly Note: checking parameters is deemed more robust (Dir 4.11)
Question 2
What is the difference between a Rule and a Directive?
Solution
- Memory allocation/deallocation can lead to undefined behaviour.
- Insufficient memory available
- Variance in program execution due to memory de/allocation
- Rule 21.3 explicitly forbids the use of
stdlib.hmemory de/allocation
If not done so already, go and do:
Exercise: MISRA
Run the analysis on your code
First thing first: make sure your code - as is, no MISRA analysis yet - is
stored in a git repository hosted on github.
Tag this version with 1.0 (after all it is indeed a first version 😉).
Afterwards, on a dedicated branch, run the analysis on your code to find
eventual issues in your application. Go about fixing them one at a time and
commit the fixes on a dedicated branch (named misra_fixes).
Important: only run the analysis on applications you have created (e.g.
blinky, semaphores, …) and not other pieces of code you do not manage. You
can obviously run an analysis, but it may be throwing very many warnings.
Note 1
With the option // MISRA-suppress: <rule-id> <mandatory justification text>
one can exclude a rule to be applied for
as long as the code holds the related comment (e.g.
// MISRA-suppress: 21.6.1 Dynamic memory should not be used, reviewed by John The Ripper 2026-01-15).
However, this really needs to be a) justified and b) tracked.
Oftentimes and regularly, the exceptions are checked to ensure quality of
the . So, a lie never lives to be old as the saying goes…
Note 2
It is important to have a good development hygiene - developing features on branches is one of them. As multiple people work on the same repository, this grants:
- Easier collaboration: each feature has its own dedicated branch, allowing multiple team members to work independently on different features at the same time.
- Fewer merge conflicts: short-lived feature branches contain code for a specific feature, reducing the chance of merge conflicts when merging into the main codebase.
- Faster deployments: features can be deployed as they are completed, since each feature is developed and tested in its own dedicated branch before being merged into the main codebase.
- Better visibility: allows team members to easily see what features are being developed and the progress of each feature, improving project planning and resource allocation.
Explanation of Git Feature Branch Workflow
MISRA - Putting everything in a pipeline
Although we use a solution that we invented, it is nevertheless important to check that whatever we create/modify is compliant to the rules.
Continuous Integration/Continuous Delivery - CI/CD
CI/CD, which stands for Continuous Integration/Continuous Delivery, is a methodology that helps developers deliver applications frequently by introducing automation into the development process. When working in development groups with many developers, continuous integration helps developers merge their code changes back into a shared branch on a regular basis (often daily). Once developers’ changes have been merged, they need to be validated. This is done by automatically building the application and running various levels of automated tests, typically unit and integration tests. If the automated tests find any bugs, they are reported back to the developers so that they can be fixed before a new version of the application is shipped.
When automated builds and tests are successful in CI, continuous delivery allows developers to automate the release of this validated code. From this perspective, CD can only happen in a CI/CD environment where CI is already built into the development pipeline. At the end of the CI/CD process, the application is ready to be deployed into production.
In our course, we will use the facilities offered by GitHub and in particular GitHub Actions & Workflows. Since you will be using GitHub for delivering your project, this makes the integration even easier.
Automating the process requires running a suite tests/linters/checkers/… on a runner - in the form of a computer - for pure SW tasks -, as well as a real or emulated device.
The goal here is to demonstrate how you can automatically check your applications.
Note
Albeit this course bases its CI/CD pipeline on GitHub, the same can be achieved with other platforms like GitLab, Jenkins, … .
CI/CD Workflow
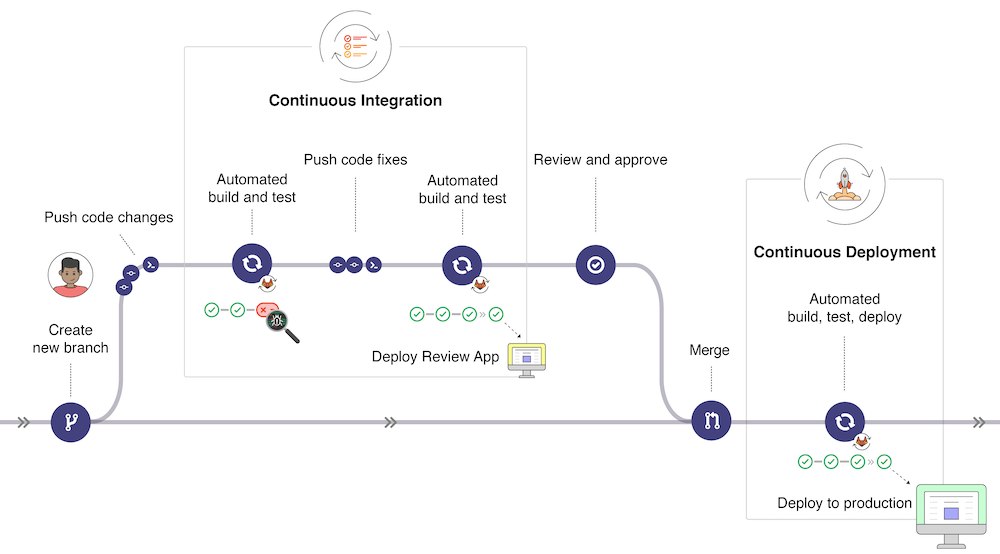
In the picture below (taken from GitLab CI/CD | GitLab, the typical development workflow is depicted. Our workflow will be simplified but it is useful to have an overview of the global picture:
- Once changes have been made to a software under development, these changes can be pushed to a specific branch in a remote Gitlab repository. As we will experience later, this push triggers the CI/CD pipeline for your project (depending on the action configuration).
- The GitLab CI/CD usually runs automated scripts to build and test your application after which it then deploys the changes in an application for review (different from the production application).
- If all tests and deployment are successful, the code changes get reviewed and approved, a merge of the specific branch into the production branch is made through a pull request and all changes are deployed to the production environment.
- If something goes wrong, changes are rolled back or further changes are made for correcting the detected problems.
Introduction to Actions and Workflows
A quick introduction to the basics of Actions can be found in the Actions quickstart guide. The following points are worth noting for a better understanding of this workflow file:
- The description is following the YAML specifications syntax. Yaml is somehow an extension of the JSON syntax for improved human readiness.
- GitHub Actions workflow is triggered when an event occurs in the repository
(specified with
on). In the example above, the workflow is triggered when a push is done, when a pull request is opened or manually with Github UI. - Each workflow contains one or more
jobs, which can run in sequential order or in parallel. Each job will run inside its own virtual machine runner or inside acontainer, and has one or morestepsthat either run a script that you define or run anaction.
MISRA checker for your application
In our case, we will ensure that changes onto specific branches are quality checked. For that, a simple solution is to run a dedicated workflow in the pipeline that ensures that
pre-commitchecks are run successfully (as someone may bypass them 😉)misra-checkeris run against the branches your define
For that, you shall
- add a
.github/workflowsfolder at the root of your project -
copy the example from the
misra analysis
   example
Important
In the file, there is a section that specifies on what branches the workflow gets triggered. Namely
Make sure you adapt it according to the branches you use in the course.on: push: branches: ["main", "develop"] pull_request: branches: ["main", "develop"] -
create a configuration file, named
misra.config.json, at the root of your project whose content is{ "sources": [ "blinky" ], "fail_on": "required", "exclude_rules": [ "6.1.1", "6.3.1", "6.5.1", "6.5.2", "7.11.1", "8.2.11", "9.3.1", "10.1.2", "14.1.1", "18.5.1", "18.5.2", "19.2.1", "21.2.2", "30.0.1" ], "extensions": ".cpp,.cxx,.cc,.c,.h,.hpp,.hh,.hxx" }Important
Make sure you adapt the
sourcessection with the content of your applications. These are the folders that are going to be scanned at every run. That is, if you add a Zephyr RTOS application, you shall update this section. -
add a second workflow by copying the following into
pre-commit.ymlname: pre-commit on: push: branches: ["main", "develop"] pull_request: branches: ["main", "develop"] jobs: pre-commit: runs-on: ubuntu-latest steps: - name: Checkout repository uses: actions/checkout@v6 - name: Install pre-commit run: | pip install --upgrade pip pip install pre-commit pre-commit install - name: Run pre-commit hooks working-directory: ${{ inputs.working-directory }} run: | git ls-files | xargs pre-commit run \ --show-diff-on-failure \ --color=always \ --files
MISRA - Going beyond
There are paid tools that are available for ensuring MISRA conformity. This, and many more SW metrics, can be had as a student with Scitool Understand.
As a student, you are elegible for a free license by subscribing to
their student program.
Go ahead and register today!
Embedded Software Testing
For embedded systems, update delivery solutions are often difficult to implement and the pace at which software updates are delivered is much slower than for other systems such as computers or smartphones. However, given the nature of embedded systems, which often operate for long periods of time, software quality is critical and ways of delivering software without compromising quality need to be developed. Automated testing is an important part of solutions aimed at improving software quality. Building, testing and deploying software with many components quickly becomes impossible. In addition, manual testing involves repetitive work and costs time that is not invested in software development. Automating everything - from build to test, deployment and infrastructure - is the only way forward. This is also true for embedded software.
In this context, CI/CD, which stands for Continuous Integration/Continuous Delivery, is a methodology that helps developers deliver applications frequently by introducing automation into the development process. When working in development groups with many developers, continuous integration helps developers merge their code changes back into a shared branch on a regular basis (often daily). Once developers’ changes have been merged, they need to be validated. This is done by automatically building the application and running various levels of automated tests, typically unit and integration tests. If the automated tests find any bugs, they are reported back to the developers so that they can be fixed before a new version of the application is shipped.
When automated builds and tests are successful in CI, continuous delivery allows developers to automate the release of this validated code. From this perspective, CD can only happen in a CI/CD environment where CI is already built into the development pipeline. At the end of the CI/CD process, the application is ready to be deployed into production.
In this codelab we will demonstrate how to run and develop automated tests for your Zephyr RTOS components and application. We will show how to test individual components of a library or application. Tests that integrate multiple components will also be developed.
Motivations for Building an Automated Test Environment
Like any other product used by customers, software needs to be tested before it is delivered to users. Of course, the easiest and most obvious way to test a product is to use it for a while and make sure it behaves as expected. Since the developer knows the application and therefore knows how to quickly test the changes made to it, you might think that this is a reliable way of testing software. Of course, this is usually wrong:
- Developers are biased towards the parts of the software they know best and the changes they have made. It is easy to forget to test some parts, or not realise the impact of a change.
- The environment in which the software runs may be different from the environment of the machine on which it was developed and tested. Very often the environment has an impact on the way a particular piece of software can run.
- Last but not least, testing is a boring and time-consuming task. Very often, developers will minimise the time they spend on testing. In some situations, people are hired to perform testing activities, but the problem remains.
Even in situations where developers and testers are two different groups of people, the disadvantage is that developers are no longer involved in testing and may lose sight of the big picture. On the other hand, testers have little knowledge of the changes that have been made and have to bother the developers whenever they find something they don’t understand.
Modern software development also requires the ability to change code quickly and safely. From this perspective, automated testing plays a key role, together with a clearly defined testing strategy that includes different types of tests. In general, tests range from unit tests, which focus on technical details, to acceptance tests, which show that the application meets its objectives. More details on the different types of tests are given in the next section. So tests can be different, but good tests tend to share the same characteristics:
- A good test is deterministic: it doesn’t matter where and when it runs, it should always produce the same outputs given the same inputs. It must also be verifiable. Of course, this sometimes makes the task of writing tests difficult.
- A good test is fully-automated: because it must be repeated endlessly, and because machines are good at repetitive tasks, tests must be performed as automated tasks by a machine.
- A good test is responsive: it must provide fast and direct feedback. Integrating test feedback into the development process is essential and must be done quickly and efficiently.
You should also be aware that
- Testing does not slow down development: in the long run, the time spent writing tests is an investment that allows changes to the software to be made in an efficient and robust way.
- Testing is not just about finding bugs: finding bugs is an important purpose, but making bugs easily detectable and fixable after each and every change is even more important. This gives developers a safety net that makes it easier to make changes to the software. Without a safety net, developers would only make very conservative changes, while some less conservative changes may be needed.
The Test Pyramid
The concept of the test pyramid was introduced by Mike Cohn in his book “Succeeding with Agile”. The concept is particularly applicable to applications with a user interface, but can easily be adapted to embedded software.
In Mike Cohn’s original concept, the test pyramid consists of three layers that any test suite should consist of (image taken from Test Pyramid in Spring Boot Microservice):
- User Interface or System Tests
- Service or Integration Tests
- Unit Tests
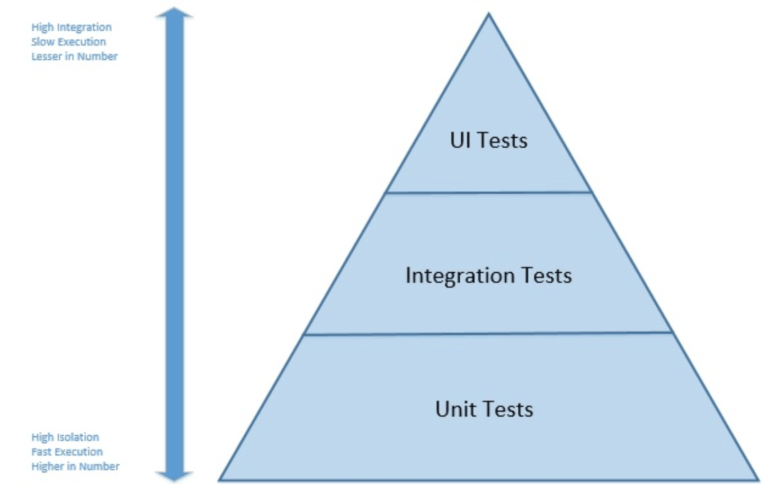
When applied to embedded systems, it is not possible to adopt this concept strictly, either in the number of layers or in the naming of the layers. However, because of its simplicity, the essence of the test pyramid is a good basis on which to build an embedded software test suite. In particular, you should try to
- Write tests with different granularities
- Adapt the number of tests to their level: low-level tests require many tests while fewer tests are needed for high-level tests.
In other words, develop a test suite with lots of small and fast unit tests. You should also write a reasonable number of integration tests and very few system tests that test your application from end to end.
Test Specification in Zephyr OS
In Zephyr RTOS, tests can be run on standard applications or on specific test
applications. In the former, tests are specified in a sample.yaml file located
in the application directory. Test applications use a testcase.yaml file
located at the root of the test application directory. In this codelab, we only
address the case of test applications.
One simple example of a testcase.yaml file is shown here:
common:
  ignore_faults: true
  tags:
    - kernel
    - threads
    - userspace
tests:
  kernel.threads.apis:
    min_flash: 34
  kernel.threads.apis.pinonly:
    min_flash: 34
    depends_on:
      - smp
    extra_configs:
      - CONFIG_SCHED_CPU_MASK_PIN_ONLY=y
Full details about the syntax used testcase.yaml files can be found
here.
Although the nomenclature used in testing with twister can be confusing, the
important points are as follows:
- Test application configurations are written using the YAML syntax.
- Configuration files may contain one or more entries in the
testssection, each of which identifies a test scenario. An example of a test scenario is thekernel.threads.apisin thetestcase.yamlfile shown above.kernel.threads.apisis a key in YAML syntax and it is the test scenario identifier. - A test scenario is a set of conditions and variables, such
min_flash: 34. This set of conditions and variables guides how test suites will be built and executed. - A test suite is a collection of test cases and a test case is the smallest test unit, often implemented as a single test function.
We will not explain the meaning of the different fields contained in the
testcase.yaml file here. Instead, we will rather explain the fields when we build our
own testcase.yaml file. First, however, we will learn how to use
twister to run tests written in the Zephyr RTOS repository.
Start Testing
The first thing you need to do when setting up a testing environment and strategy for your application is to start testing the existing source components. What does that mean on the Zephyr RTOS platform?
The Zephyr RTOS platform provides several tools to assist in the development of an appropriate test suite:
- Unit tests can be developed and built using a separate build system. Unit tests are built and run on the host/development machine and have no hardware or software dependencies.
- ztest is the test framework used to write test programs and is provided as part of the Zephyr RTOS platform. With this framework, developers can write functional unit tests in C, but also integration tests that can implement complex use cases that run on microcontrollers.
- twister is the test runner provided as part of the Zephyr RTOS platform. With twister, you can build and run test programs on physical boards or emulated environments.
Discovering and Running Existing Tests
This section explains how to use twister to build and run test programs that are part of the Zephyr RTOS library, both on physical boards and in emulated environments. The use of twister is extensively documented here.
The first initial steps for building and running tests are the following:
- You can list all tests that are available for a specific platform with
terminalassuming that all dependencies have been installed in the “deps” folder.
west twister --list-tests -T deps -p nrf5340dk/nrf5340/cpuapp - You can limit the tests to list or run by specifying a tag value. For example,
if you want to limit the list of tests to those tagged with
cpporkernel, you can add-t cppor-t kernelto the command. If you limit the tests tocpp, you should see that somezpp_libtests are listedconsole... - zpp_lib.zpp_rtos.zpp_mutex.mutex_lock_unlock - zpp_lib.zpp_rtos.zpp_semaphore.semaphore_release_acquire ... - You can then select one of the tests and compile it for the chosen platform by
running, for example,
terminalUnless the selected test is not supported for the target board, the test program should compile.
west twister --build-only -T deps/zpp_lib/zpp_rtos -p nrf5340dk/nrf5340/cpuapp
Running the above commands will show you that all the output files generated by
twister are stored in a folder called “twister-out”. Older folders are
automatically renamed to “twister-out.X” (e.g. “twister-out.1”) when a new test
is run. You can specify a different folder for the results by adding the -O
OUTDIR option to any twister command, in which case the “OUTDIR” folder will be
cleared before the test begins.
Hint
If you want to know what tests are planned for execution after west twister
--build-only, check out testplan.json.
Running Tests on Physical Device
Note
Do not connect through the serial interface to your physical device when running twister. twister requires to access the physical device using the serial connection (via USB) and it will fail if you are already connected using a serial terminal for instance.
Hint
Use nrfutil device list to figure out what serial port you are using.
For running tests on a physical device, you may choose of the following options:
- Run the test on a single device with the command
terminalwhere “COM_PORT” is the serial port to which your device is connected.
west twister -T deps/zpp_lib/zpp_rtos -p nrf5340dk/nrf5340/cpuapp --device-testing --device-serial "COM_PORT" -
Run the test on a single or several devices by first building a device map:
-
Run the following command:
terminalThis will probe the serial devices connected to your computer and generate a hardware map file such as:west twister --generate-hardware-map my_map.yamlmy_map.yamlYou need to update the content of the file with the missing information, such as:- connected: true id: '001050027516' platform: unknown product: J-Link runner: jlink serial: /dev/cu.usbmodem0010500275161 - connected: true id: '001050027516' platform: unknown product: J-Link runner: jlink serial: /dev/cu.usbmodem0010500275163my_map.yamlIf you have more than one device connected to your computer, you will need to update the file for each specific entry. Also note that you may need to update the file to match connection status and ports as you connect and reconnect devices to your computer. Your- connected: true id: 0038001F3431511037393330 platform: nrf5340dk/nrf5340/cpuapp product: J-Link runner: nrfutil serial: /dev/cu.usbmodem0010500275163nrf5340dk/nrf5340/cpuappdevice will also most probably display two connected serial ports and you need to select the proper one. -
Once the hardware map file has been updated correctly, you may run
terminalfor executing tests on one or several devices connected to your computer.west twister -p nrf5340dk/nrf5340/cpuapp -T deps/zpp_lib --device-testing --hardware-map my_map.yaml
-
Running Tests on Emulated Device
With twister and Zephyr RTOS it is possible to run test programs on emulated devices. In the getting started codelab, you learned the installation, configuration and run on a emulated device.
Test programs may also be run on an emulated platform as follows:
- The test program should include the proper definitions for the “boards/qemu_x86.conf” and “boards/qemu_x86.overlay files in
the “boards” folder in the application folder. This is the case for instance for the
zpp_libtest programs. - If you run
west twister -p qemu_x86 -T deps/zpp_lib/zpp_rtos/tests --integration, you should observe that thezpp_libtest programs are executed successfully on the qemu_x86 device.
Running Test Programs as Standard Zephyr RTOS Programs
When developing a software, it can be useful to run test programs outside the
twister test framework. This is easy to do since any test program is a
standard Zephyr RTOS program. For example, you can build this test program
using west build deps/zpp_lib/zpp_rtos/tests/mutex and flash your device.
The main difference is that the test results will not be collected. However,
you can view the test results by opening a serial terminal as you would do
for any application.
When running test programs outside the test framework, it is, of course, only possible to build and run one test program at a time. Unlike what you do with Twister, you cannot specify a number of test programs to be run.
Note that one difference when using the ztest framework as compared to a
standard Zephyr RTOS application is that the test function is not executed
from the main thread but rather from a dedicated thread with priority -1.
Writing Your Own Test Programs
The framework we experimented with in the previous section enables us to write our own test programs. The simplest method for this purpose is to use the Zephyr RTOS Test Framework ztest. This framework provides assertion macros and a generic test structure that are useful for this purpose.
Test programs can be placed anywhere in the application directory structure, but
it is common to place them in a folder named tests. In any case, tests are
identified by the presence of a testcase.yaml file that describes the various
test scenarios.
Write A Simple Test Program That Always Succeeds
Our first test program will be very simple and it will allow us to discover the
most important features of the test frameworks. For developing this test
program, you must first create a simple_test folder. We recommend to place it
in a tests folder of the blinky application folder (for your blinky
Zephyr RTOS application) - you may want to create the new “tests” folder your
real car_sim at this point.
In the simple_test folder, create another folder named “always_succeed”. In
the latter folder, create a testcase.yaml file with the following content:
tests:
  simple_test.always_succeed:
    tags:
      - cpp
This file defines a single test scenario with the identifier simple_test.always_succeed.
This test scenario uses a cpp tag to allow tests to be filtered based on this specific tag.
The always-succeed test can be implemented as follows in the src/test.cpp file:
#include <zephyr/ztest.h>

ZTEST(always_succeed, test_equality) {
  // this is the always succeed test
  zassert_true(4 == 2 * 2);
}

ZTEST_SUITE(always_succeed, nullptr, nullptr, nullptr, nullptr, nullptr);
This test program uses two macros:
-
ZTEST_SUITEcreates a test suite to which you can add test cases/functions. In this example, the only parameter used is the suite name (note that it has not been stringified yet). The meaning of the other parameters is described here. -
ZTESTcreates a new test and attaches it to the declaredalways_succeedtest suite.test_equalityis the name of the test function created by this definition, which will be called when the test suite is executed.
If you run this test with the command west twister -p nrf5340dk/nrf5340/cpuapp -T
blinky/tests/simple_test/always_succeed --device-testing --hardware-map
my_map.yaml, you should see a successful result like this one:
INFO    - Total complete:    1/   1  100%  built (not run):    0, filtered:    0, failed:    0, error:    0
INFO    - 1 test scenarios (1 configurations) selected, 0 configurations filtered (0 by static filter, 0 at runtime).
INFO    - 1 of 1 executed test configurations passed (100.00%), 0 built (not run), 0 failed, 0 errored, with no warnings in 41.78 seconds.
INFO    - 1 of 1 executed test cases passed (100.00%) on 1 out of total 1115 platforms (0.09%).
INFO    - 1 test configurations executed on platforms, 0 test configurations were only built.
The simple always-succeed example does not utilize some important
configuration features for tests. In particular, ZTEST_SUITE can be called
using the following syntax ZTEST_SUITE(SUITE_NAME, PREDICATE, setup_fn,
before_fn, after_fn, teardown_fn) where:
PREDICATEis a function to test against the state and determine if the test should run.setup_fnis the setup function to call before running this test suitebefore_fnis the function to call before each unit test in this suiteafter_fnis the function to call after each unit test in this suiteteardown_fnThe function to call after running all the tests in this suite
This set of functions enables highly flexible configuration of test suites.
Important
Remember to add CMakeLists.txt and prj.conf to simple_test.
Test a basic C++ component
One important feature in the C++ language is the concept of smart pointers. Unlike raw pointers, smart pointers are designed to ensure that programs free memory and resources when they are no longer referenced any more. This mechanism thus prevents memory and resource leaks. It is also exception-safe, meaning that the expected behavior is also guaranteed in the case of an exception.
In this section, we demonstrate how the behavior of raw and smart pointers
can be tested. Raw pointers simply behave as addresses to memory locations and
with raw pointers, so it is the programmer’s responsability to deallocate
any memory space allocated with a new or a malloc. In contrast, smart
pointers allow memory allocation to be encapsulated within classes, ensuring that memory
is released whenever the object encapsulating the memory buffer is destroyed.
Smart pointers are now implemented as part of the C standard using the
std::unique_ptr or the
std::shared_ptr classes.
std::unique_ptr and std::shared_ptr both implement mechanisms for a proper
deallocation of the encapsulated resource. However, they differ in the way they
handle the ownership of the resource:
- With
std::unique_ptronly one variable can refer to the object and the allocated resource will be reclaimed when that variable is destroyed. Transfering the ownership of the resource cannot be done with the assignment operator (operator=()) and instead one must use thestd::move()semantics. - With
std::shared_ptr, the ownership of the resource can be shared among several variables. A reference counting mechanism is implemented and when the last reference to the resource is destroyed, then it is reclaimed. Be aware that circular references are possible withstd::shared_ptr.
For testing the behavior of both raw and smart pointers, we use a simple
Test structure, with the following definition:
struct Test {
    Test() {
        _instanceCount++;
        _value = 33;
    }

    ~Test() {
        _instanceCount--;
        _value = 0;
    }

    int _value;
    static uint32_t _instanceCount;
};
This structure contains a static attribute that counts the number of live
instances, by incrementing/decrementing it upon construction/destruction. With
this mechanism, we can test the following behaviors:
- Test that a shared pointer created in a given scope will be destroyed when the scope is left. When the pointer is destroyed, the memory it encapsulates will be freed.
- Test that multiple instances of shared pointers correctly manage the reference count and that the object is released correctly.
- Test that when creating a raw pointer and deallocating it correctly, the destructor is called.
The tests described above can be integrated in a test program under
simple_test/ptr_test as shown below. If you run the test, you
should see that all test cases run successfully.
Test file implementation
#include <zephyr/ztest.h>

// std
#include <memory>

// Structure used for testing instance counts
struct Test {
    Test() {
        _instanceCount++;
        _value = kMagicNumber;
    }

    ~Test() {
        _instanceCount--;
        _value = 0;
    }

    int _value;
    static constexpr uint32_t kMagicNumber = 33;
    static uint32_t _instanceCount;
};
// static data member definitions
uint32_t Test::_instanceCount = 0;

/**
 * Test that a shared pointer correctly manages the lifetime of the underlying raw pointer
 */
ZTEST(ptr_test, test_single_sharedptr_lifetime) {
    // Sanity-check value of instance counter
    zassert_equal(0, Test::_instanceCount);

    // Create and destroy shared pointer in given scope
    {
        std::shared_ptr<Test> shared_ptr(new Test);
        zassert_equal(1, Test::_instanceCount);
        zassert_equal(Test::kMagicNumber, shared_ptr->_value);
    }

    // Destroy shared pointer
    zassert_equal(0, Test::_instanceCount);
}

/**
 * Test that multiple instances of shared pointers correctly manage the reference count
 * to release the object at the correct point
 */
ZTEST(ptr_test, test_instance_sharing) {
    std::shared_ptr<Test> shared_ptr1(nullptr);

    // Sanity-check value of counter
    zassert_equal(0, Test::_instanceCount);

    // Create and destroy shared pointer in given scope
    {
        std::shared_ptr<Test> shared_ptr2(new Test);
        zassert_equal(1, Test::_instanceCount);
        // share share_ptr2 with shared_ptr1
        shared_ptr1 = shared_ptr2;
        // still one instance only
        zassert_equal(1, Test::_instanceCount);
        zassert_equal(Test::kMagicNumber, shared_ptr1->_value);
        zassert_true(shared_ptr1.get() == shared_ptr2.get());
    }

    // shared_ptr1 still owns a raw pointer
    zassert_equal(1, Test::_instanceCount);

    shared_ptr1 = nullptr;

    // shared pointer has been destroyed
    zassert_equal(0, Test::_instanceCount);
}

ZTEST_SUITE(ptr_test, NULL, NULL, NULL, NULL, NULL);
Integrating Tests in CI
Now that we have developed some automated test programs for Zephyr RTOS, we may want to benefit from those test programs for automating both the build process and the test process. For doing so, we will use the facilities offered by GitHub and in particular GitHub Actions. Since you will be using GitHub for delivering your project, this makes the integration of actions even easier.
Automating the test process requires running the ztest suite on a real or
emulated board. GitHub CI/CD does not necessarily provide a runner that matches
the nrf5340dk/nrf5340/cpuappdevice. However, the Zephyr SDK (available on Linux and
macOS) includes QEMU, which makes it possible to emulate a board (here
qemu_x86) and run the tests.
The goal here is to demonstrate how you can automatically build your applications and how you can automate tests.
Note
Albeit this course bases its CI/CD pipeline on GitHub, the same can be achieved with other platforms like GitLab, Jenkins, … .
Integrate the Test Stage
In the previous step, we have developed a number of test programs. For automating test builds, we will now integrate those builds into our pipeline GitHub Actions / Workflows.

Once you create the workflow, you may edit it and add the contents below:
Workflow file definition
    # ─────────────────────────────────────────────────────────────
    #  Zephyr - Twister CI on QEMU x86
    # ─────────────────────────────────────────────────────────────
    name: Twister - QEMU x86

    on:
      push:
        branches: [main]
      pull_request:
        branches: [main]
      workflow_dispatch:          # manual trigger from the Actions tab

    # ── Your versions here ──────────────────────────────────
    env:
      ZEPHYR_SDK_VERSION:  0.17.4                           # Zephyr SDK release tag
      ZEPHYR_SDK_INSTALL:  /opt/zephyr-sdk-0.17.4           # installation path
      WEST_MANIFEST_FILE:  manifest-repo/west.yml           # manifest inside your repo
      TWISTER_CONF:        twister.conf.json                 # test configuration file
      TWISTER_PLATFORM:    qemu_x86
      PYTHON_VERSION:      "3.12"

    concurrency:
      group: ${{ github.workflow }}-${{ github.ref }}
      cancel-in-progress: true

    jobs:
      twister:
        runs-on: ubuntu-latest
        permissions:
          checks: write
          contents: read
        timeout-minutes: 45

        steps:
          # ────────────────── Checkout ──────────────────
          - name: Checkout application repository
            uses: actions/checkout@v6
            with:
              path: app

          # ────────────────── Python ────────────────────

          - name: Install west and base Python deps
            run: pip install west

          # ────────────────── West init / update ────────
          - name: Initialise west workspace
            run: west init -l --mf "$WEST_MANIFEST_FILE" app

          # Cache west module downloads (zephyr, HALs, etc.)
          - name: Cache west modules
            uses: actions/cache@v5
            id: cache-west
            with:
              path: |
                deps/
              key: west-modules-${{ hashFiles('app/manifest-repo/west.yml') }}
              restore-keys: |
                west-modules-

          - name: West update
            if: steps.cache-west.outputs.cache-hit != 'true'
            run: west update --narrow --fetch-opt=--depth=1

          # ────────────────── Zephyr SDK ────────────────
          - name: Cache Python packages
            uses: actions/cache@v5
            id: cache-pip
            with:
              path: ~/.cache/pip
              key: pip-${{ runner.os }}-${{ hashFiles('deps/zephyr/scripts/requirements.txt') }}
              restore-keys: |
                pip-${{ runner.os }}-

          - name: Install Zephyr Python requirements
            run: |
              pip install -r deps/zephyr/scripts/requirements.txt

          - name: Cache Zephyr SDK
            uses: actions/cache@v5
            id: cache-sdk
            with:
              path: ${{ env.ZEPHYR_SDK_INSTALL }}
              key: zephyr-sdk-${{ env.ZEPHYR_SDK_VERSION }}-x86_64

          - name: Download & install Zephyr SDK
            if: steps.cache-sdk.outputs.cache-hit != 'true'
            run: |
              SDK_BASE_URL="https://github.com/zephyrproject-rtos/sdk-ng/releases/download"
              SDK_FILE="zephyr-sdk-${ZEPHYR_SDK_VERSION}_linux-x86_64_minimal.tar.xz"

              wget -q "${SDK_BASE_URL}/v${ZEPHYR_SDK_VERSION}/${SDK_FILE}"
              tar xf "$SDK_FILE" -C /opt
              rm "$SDK_FILE"

              # Install only the x86 toolchain (keeps the cache small)
              pushd "$ZEPHYR_SDK_INSTALL"
                ./setup.sh -t x86_64-zephyr-elf -c
              popd

          - name: Register Zephyr SDK CMake package
            run: |
              ${{ env.ZEPHYR_SDK_INSTALL }}/setup.sh -c

          # ────────────────── System deps (QEMU) ────────
          - name: Install QEMU and build tools
            run: |
              sudo apt-get update -qq
              sudo apt-get install -y --no-install-recommends \
                qemu-system-x86 \
                ninja-build \
                ccache \
                device-tree-compiler

          # Optional: ccache for faster rebuilds
          - name: Cache ccache artefacts
            uses: actions/cache@v5
            with:
              path: ~/.cache/ccache
              key: ccache-${{ env.TWISTER_PLATFORM }}-${{ github.sha }}
              restore-keys: |
                ccache-${{ env.TWISTER_PLATFORM }}-

          # ────────────────── Twister run ───────────────
          - name: Build Twister test-root args from config
            id: test-roots
            run: |
              ARGS=""
              for row in $(jq -c '.applications[]' "app/$TWISTER_CONF"); do
                app=$(echo "$row" | jq -r '.name')
                tests=$(echo "$row" | jq -r '.tests // empty')
                if [ -z "$tests" ]; then
                  # No tests specified — let Twister discover all tests under the app
                  ARGS="$ARGS --testsuite-root $GITHUB_WORKSPACE/app/${app}"
                else
                  for test in $(echo "$row" | jq -r '.tests[]'); do
                    ARGS="$ARGS --testsuite-root $GITHUB_WORKSPACE/app/${app}/${test}"
                  done
                fi
              done
              echo "twister_args=$ARGS" >> "$GITHUB_OUTPUT"

          - name: Run Twister
            env:
              ZEPHYR_BASE: ${{ github.workspace }}/deps/zephyr
              ZEPHYR_TOOLCHAIN_VARIANT: zephyr
              ZEPHYR_SDK_INSTALL_DIR: ${{ env.ZEPHYR_SDK_INSTALL }}
              USE_CCACHE: 1
              QEMU_BINARY: qemu-system-i386
            run: |
              west twister \
                --platform "$TWISTER_PLATFORM" \
                ${{ steps.test-roots.outputs.twister_args }} \
                --outdir twister-out \
                --inline-logs \
                --overflow-as-errors \
                -vvv

          # ────────────────── Artefacts ─────────────────
          - name: Upload Twister results
            if: always()
            uses: actions/upload-artifact@v6
            with:
              name: twister-results
              path: |
                twister-out/twister.xml
                twister-out/twister.json
                twister-out/twister.log
              retention-days: 14

          - name: Publish test report (JUnit)
            if: always()
            uses: mikepenz/action-junit-report@v6
            with:
              report_paths: twister-out/twister.xml
              check_name: Twister Results
In addition, you also have to create a file named twister.conf.json and add the following content to it:
{
    "_comment": "The first application specifies a test, while the second auto-discover all tests by removing the 'tests' array.",
    "applications": [
    {
    "name": "blinky",
    "tests": ["tests/simple_test/always_succeed"]
    },
    {
    "name": "semaphores"
    }
]
}
- add a specific test in an application - the first example with
blinky - add an application that contains tests - the second
semaphoresexample
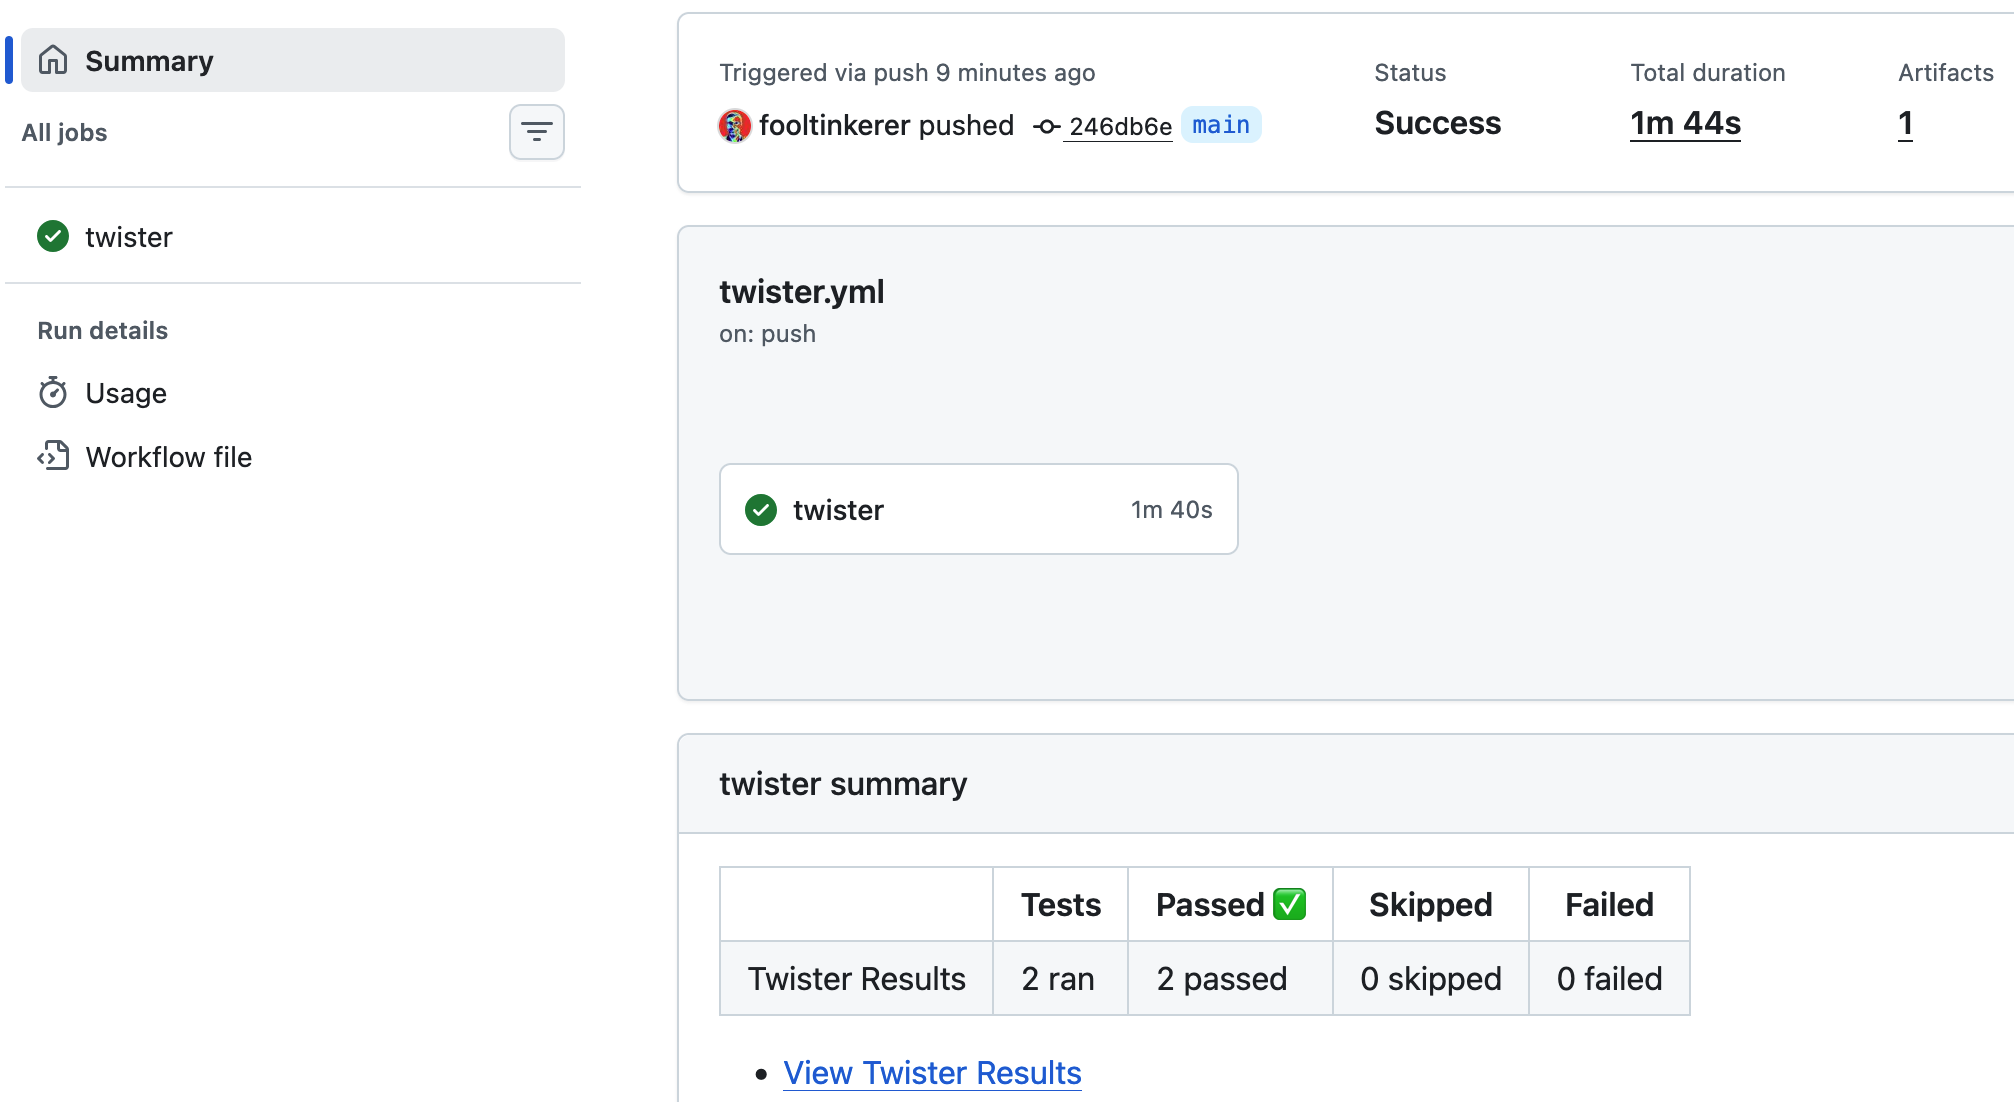
The results can be seen under _Twister - QEMU x86 _ and look like this:
Your newly implemented workflow
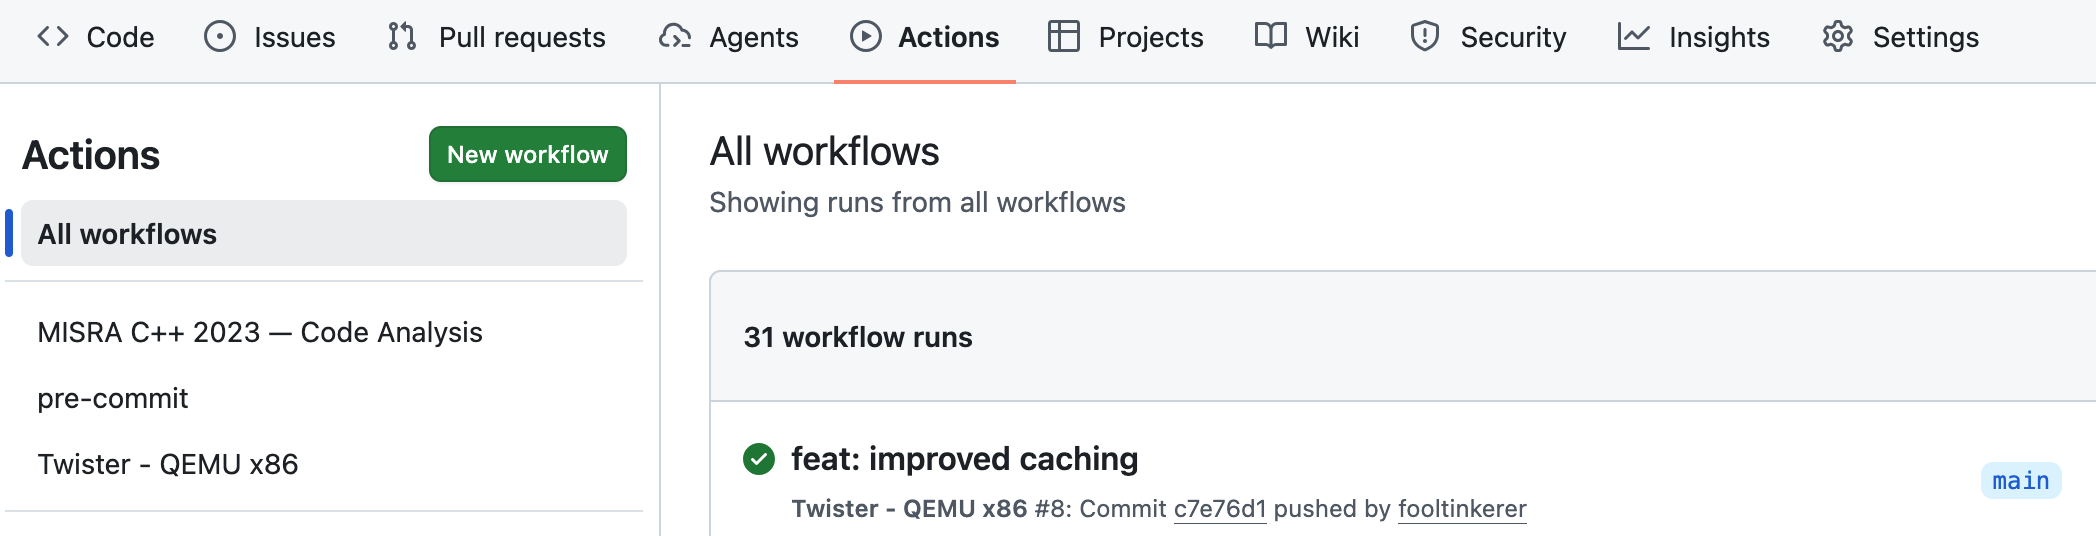
Presently our workflow file includes the definitions of workflows named
- MISRA C++ 2023 — Code Analysis
- pre-commit
- Twister - QEMU x86
as per image below. These jobs are executed on push, pull request or manual dispatch.
Configure your workflow
Depending on your specific needs, you may adapt the workflow file as follows:
- Modify the events that trigger the workflow by editing the
onkey. - Modify the applications on which the workflow should run.
Question 3
What would you need to do if you wanted to have a summary after every workflow run and not solely in case of a Pull Request?
Hint
Check what the following does in misra-analysis.yml
- name: Post PR summary
    if: always() && github.event_name == 'pull_request'
Solution
For getting a summary on all runs, remove && github.event_name == 'pull_request'.